I'd seen a lot of this water colouring technique on craft (or crumb cake) coloured card so I thought I'd give it a go. After white heat embossing the flowers I used white ink to water colour the flowers. Then I used regular pink ink to water colour over the white. I think I did two or three layers of the pink to achieve some shading on the flowers. The colours are more intense close up.
Materials:
Cardstock: Crumb Cake, Rose Red
Ink: Rose Red, Versamagic in Cloud White, Versamark (I can't remember if the background was stamped with Versamark or Rose Red ink)
Stamps: 5th Avenue Floral, Distressed Dots
Accessories: Basic pearls, chipboard 'happy birthday', waterproof craft mat
Tools: Big shot machine, top note die, heat tool, white embossing powder, embossing buddy, aqua painter pen, Sakura clear glitter gel pen, liquid glue
Tips:
1. I sponged the chipboard with white ink and let it dry before using the glitter gel pen over the top.
2. The stamens of the flowers were also coloured with glitter gel pen but I must have done that after I took the photo.
Showing posts with label Crumb Cake. Show all posts
Sunday, January 12, 2014
Thursday, May 31, 2012
Bright Birthday
Hi there, I'm still making cards just have been so busy I've not gotten around to posting them. Let's start with this one that I made back in April.
The layout was cased from another card. I have the picture of it but not the website or designer. I will add it as soon as I can find it.
This is how it was done -
Materials:
Cardstock: Crumb Cake, Brightside 6x6 paper (Lawn Fan)
Ink: Tuxedo Black (Memento)
Stamps: Bake Me a Cake, Sophie's Sentiments (both Lawn Fawn)
Accessories: Basic rhinestones, Lemondrop twine (The Twinery), iridescent glitter.
Tools: Beautiful Wings embosslit, square punch, 2 way glue pen, dimensionals, glue tape
Tips and Tricks:
1. This card is pretty straight forward. I used the 2 way glue pen to adhere the glitter to the cupcakes and butterfly. Here's a pic of the glitter, blurry I know but you get the idea:
Stuff Ups:
1. I'm not happy with the way I stamped some of the cupcakes. The cherry is lopsided and that swirl just doesn't look good.
Pleasant Surprises:
1. The butterfly looked great with the glitter on it and the twine wrapped around it to make the body and antennae.
The layout was cased from another card. I have the picture of it but not the website or designer. I will add it as soon as I can find it.
This is how it was done -
Materials:
Cardstock: Crumb Cake, Brightside 6x6 paper (Lawn Fan)
Ink: Tuxedo Black (Memento)
Stamps: Bake Me a Cake, Sophie's Sentiments (both Lawn Fawn)
Accessories: Basic rhinestones, Lemondrop twine (The Twinery), iridescent glitter.
Tools: Beautiful Wings embosslit, square punch, 2 way glue pen, dimensionals, glue tape
Tips and Tricks:
1. This card is pretty straight forward. I used the 2 way glue pen to adhere the glitter to the cupcakes and butterfly. Here's a pic of the glitter, blurry I know but you get the idea:
Stuff Ups:
1. I'm not happy with the way I stamped some of the cupcakes. The cherry is lopsided and that swirl just doesn't look good.
Pleasant Surprises:
1. The butterfly looked great with the glitter on it and the twine wrapped around it to make the body and antennae.
Monday, April 23, 2012
3rd Anniversary
Happy 3rd anniversary to my gorgeous hubby! This is the card I made for him. It's very cutesy but he likes it anyway. The muffins were inspired by this card by Chari Moss.
Here's how I made it:
Materials:
Cardstock: Confetti White, Crumb Cake, old blue that was lying around.
Ink: Tuxedo Black (Memento), Crumb Cake, markers - Crumb Cake, Bashful Blue, Pink Pirouette, Pretty in Pink, Real Red, Basic Black.
Stamps: Love n Breakfast, Sopie's Sentiments (both Lawn Fawn).
Accessories: Hemp twine, Bevelled Window Panes, blue organza ribbon (Kaiser Craft), Basic Rhinestones.
Tools: Big Shot machine, polka dot embossing folder, sponge, mini glue dots, dimensionsals.
Tips and Tricks:
1. It's pretty straight forward - the embossed white layer was sponged with Crumb Cake ink around the edges.
2. I adhered the bevelled window pane with mini glue dots because I couldn't think of a better way to keep it in place. If you know a better way, please let me know in the comments. Thanks!
3. Those spots either side of the sentiment are rhinestones.
Stuff Ups:
1. The muffins are a little big to fit under the window pane properly.
2. The confetti cardstock is gorgeous - full of little bits so it looks recycled. Unfortunately one of those bits looks like a red splotch above the sentiment, oh well.
3. The glue dots show through the window pane.
4. Probably should have positioned the centre panel lower and cut the ribbon shorter.
Pleasant Surprises:
1. I like the blue cardstock. It was a bit flimsy but the colour is pretty.
2. The muffins are cute and my colouring in was not atrocious.
Here's how I made it:
Materials:
Cardstock: Confetti White, Crumb Cake, old blue that was lying around.
Ink: Tuxedo Black (Memento), Crumb Cake, markers - Crumb Cake, Bashful Blue, Pink Pirouette, Pretty in Pink, Real Red, Basic Black.
Stamps: Love n Breakfast, Sopie's Sentiments (both Lawn Fawn).
Accessories: Hemp twine, Bevelled Window Panes, blue organza ribbon (Kaiser Craft), Basic Rhinestones.
Tools: Big Shot machine, polka dot embossing folder, sponge, mini glue dots, dimensionsals.
Tips and Tricks:
1. It's pretty straight forward - the embossed white layer was sponged with Crumb Cake ink around the edges.
2. I adhered the bevelled window pane with mini glue dots because I couldn't think of a better way to keep it in place. If you know a better way, please let me know in the comments. Thanks!
3. Those spots either side of the sentiment are rhinestones.
Stuff Ups:
1. The muffins are a little big to fit under the window pane properly.
2. The confetti cardstock is gorgeous - full of little bits so it looks recycled. Unfortunately one of those bits looks like a red splotch above the sentiment, oh well.
3. The glue dots show through the window pane.
4. Probably should have positioned the centre panel lower and cut the ribbon shorter.
Pleasant Surprises:
1. I like the blue cardstock. It was a bit flimsy but the colour is pretty.
2. The muffins are cute and my colouring in was not atrocious.
Friday, April 6, 2012
Happy Easter
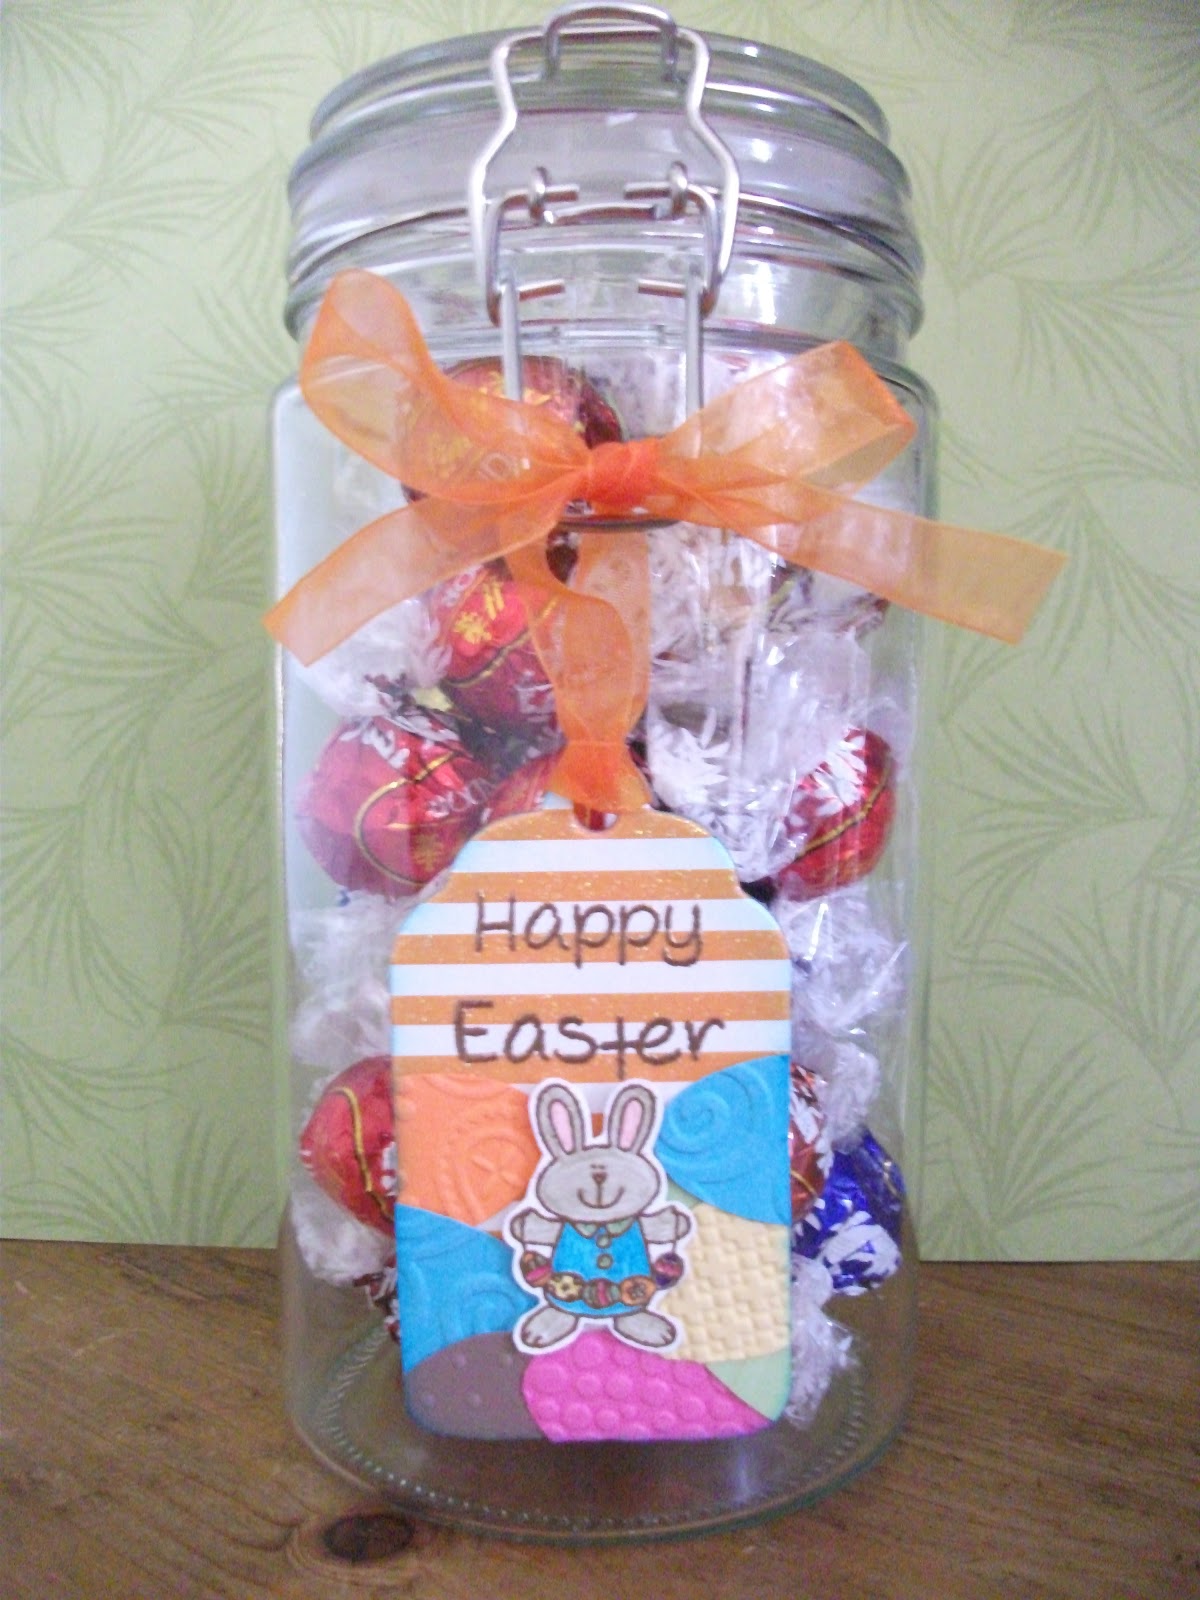
I have something different to show today - not a card! I decorated a tag. I've never used tags for anything so this was new to me. I'm only moderately happy with it. The concept was better in my head, the execution of it isn't great. Oh well, I tried!
Here's a closer view of the tag:
Materials:
Cardstock: Whisper White, Tempting Turquoise, Tangerine Tango, So Saffron, Pear Pizzazz (or Kiwi Kiss, not sure), Chocolate Chip and Pink Passion (I think it's retired).
Ink: Tempting Turquoise, Versamark, markers - Tempting Turquoise, Blushing Bride, Crumb Cake, Wild Wasabi, Melon Mambo, Elegant Eggplant, Tangerine Tango, So Saffron.
Stamps: Greetings Eight (Stampin' Up), Jessie's ABC's (Lawn Fawn).
Accessories: Chipboard glitter tag (don't know the brand - it's so old!), Orange organza ribbon (Kaiser Craft), antique gold embossing powder.
Tools: Heat tool, embossing static pillow, dimensionals, big shot machine, sponge, lattice embossing folder (Stampin' Up), paisley and swirly embossing folders (Sizzix), polka dot and bubble embossing folders (Cuttlebug), paper snips, oval punch, glue tape.
Tips and Tricks:
1. I heat embossed the Happy Easter sentiment and bunny first.
2. Then I sponged around the tag and let it dry.
3. I punched and embossed the coloured Easter eggs (yes, that's what they are meant to be!).
4. After positioning the Easter eggs with glue tape I trimmed off the excess and sponged around the edges.
5. The bunny was added on dimensionals. Dimensionals are also used to adhere the tag to the jar.
Stuff Ups:
1. The overall result - just not thrilled.
2. The 't' in Easter is upside down. *sigh*
3. Maybe the Easter eggs should have been smaller so they actually look like Easter eggs.
Pleasant Surprises:
1. The bunny is cute and I managed to cut it out nicely.
2. The sponging on the tag itself was nice (just the tag, not the eggs).
3. The heat embossing turned out nicely.
Here's a closer view of the tag:
Materials:
Cardstock: Whisper White, Tempting Turquoise, Tangerine Tango, So Saffron, Pear Pizzazz (or Kiwi Kiss, not sure), Chocolate Chip and Pink Passion (I think it's retired).
Ink: Tempting Turquoise, Versamark, markers - Tempting Turquoise, Blushing Bride, Crumb Cake, Wild Wasabi, Melon Mambo, Elegant Eggplant, Tangerine Tango, So Saffron.
Stamps: Greetings Eight (Stampin' Up), Jessie's ABC's (Lawn Fawn).
Accessories: Chipboard glitter tag (don't know the brand - it's so old!), Orange organza ribbon (Kaiser Craft), antique gold embossing powder.
Tools: Heat tool, embossing static pillow, dimensionals, big shot machine, sponge, lattice embossing folder (Stampin' Up), paisley and swirly embossing folders (Sizzix), polka dot and bubble embossing folders (Cuttlebug), paper snips, oval punch, glue tape.
Tips and Tricks:
1. I heat embossed the Happy Easter sentiment and bunny first.
2. Then I sponged around the tag and let it dry.
3. I punched and embossed the coloured Easter eggs (yes, that's what they are meant to be!).
4. After positioning the Easter eggs with glue tape I trimmed off the excess and sponged around the edges.
5. The bunny was added on dimensionals. Dimensionals are also used to adhere the tag to the jar.
Stuff Ups:
1. The overall result - just not thrilled.
2. The 't' in Easter is upside down. *sigh*
3. Maybe the Easter eggs should have been smaller so they actually look like Easter eggs.
Pleasant Surprises:
1. The bunny is cute and I managed to cut it out nicely.
2. The sponging on the tag itself was nice (just the tag, not the eggs).
3. The heat embossing turned out nicely.
Saturday, March 17, 2012
Happy St Patrick's Day
It's not often that I make a card that I don't intend to give away but here's one. I want to keep this one for my own collection. It's not my design - I found the design at Card Scraps. I thought it was so simple yet cute!
Here's my very slightly modified, not nearly as good version:
Happy St Patrick's to you all! Have a great day!
Materials:
Cardstock: Garden Green, Crumb Cake, Whisper White.
Ink: Garden Green.
Stamps: So Happy For You, Teeny Tiny Sentiments.
Accessories: Green organza ribbon (Kaiser Craft).
Tools: Big shot machine, Top Note die, Lattice embossing folder, scissors, bone folder, tape runner, scallop oval punch, oval punch, paper trimmer, dimensionals.
Tips and Tricks:
1. Stamp the four leaf clover on the Whisper White card then cut with the Top Note die.
2. Run the die cut through the Big Shot in the lattice embossing folder.
3. Trim the die cut along the perforation so it fits nicely on another Top Note die cut.
4. Glue it altogether. Easy!
Stuff Ups:
1. The stamped image isn't as solid as I would like. If I had time I might have coloured over them with a marker.
2. I still can't tie bows properly or straight.
Pleasant Surprises:
1. Just that I feel it's strikingly effective!
Here's my very slightly modified, not nearly as good version:
Happy St Patrick's to you all! Have a great day!
Materials:
Cardstock: Garden Green, Crumb Cake, Whisper White.
Ink: Garden Green.
Stamps: So Happy For You, Teeny Tiny Sentiments.
Accessories: Green organza ribbon (Kaiser Craft).
Tools: Big shot machine, Top Note die, Lattice embossing folder, scissors, bone folder, tape runner, scallop oval punch, oval punch, paper trimmer, dimensionals.
Tips and Tricks:
1. Stamp the four leaf clover on the Whisper White card then cut with the Top Note die.
2. Run the die cut through the Big Shot in the lattice embossing folder.
3. Trim the die cut along the perforation so it fits nicely on another Top Note die cut.
4. Glue it altogether. Easy!
Stuff Ups:
1. The stamped image isn't as solid as I would like. If I had time I might have coloured over them with a marker.
2. I still can't tie bows properly or straight.
Pleasant Surprises:
1. Just that I feel it's strikingly effective!
Saturday, December 3, 2011
Christmas, oh how I love you!
What a month I've had! I did get my preparation done in time for my interview and it certainly paid off as I got the job! I'll be teaching at a brand new school next year that is still being built! It's so exciting! Yay!
I also finished all my Christmas cards yesterday, thank goodness. It's taken me 3 months on and off to get them done. I tried paper piecing and I'm pleased with the results. The colours pop more in real life, I just couldn't get a decent snap of the card today, sigh.
I made 50 plus some spares. I used different patterned paper (as I've posted in a previous entry) so each card is different from the next one.
Materials:
Cardstock: Crumb Cake, Old Olive, Cherry Cobbler, Very Vanilla, patterned paper is called December 25th by Kaisercraft.
Ink: Old Olive, Cherry Cobbler, Crumb Cake, Daffodil Delight, Memento ink in Tuxedo Black, Basic Black marker.
Stamps: Ornate Ornaments by Lawn Fawn.
Other: Basic Rhinestones, sponge.
Tips and Tricks:
1. Since I was making so many cards I did it all in stages like an assembly line:
3. I use my scissors to help me attach the sticky back rhinestones accurately. I find it easier than using tweezers.
Stuff Ups:
1. Lots. When making so many cards, mistakes are easy to make. The most mistakes were to do with stamping, the image smudging or not stamping fully, etc, etc.
I also finished all my Christmas cards yesterday, thank goodness. It's taken me 3 months on and off to get them done. I tried paper piecing and I'm pleased with the results. The colours pop more in real life, I just couldn't get a decent snap of the card today, sigh.
I made 50 plus some spares. I used different patterned paper (as I've posted in a previous entry) so each card is different from the next one.
Materials:
Cardstock: Crumb Cake, Old Olive, Cherry Cobbler, Very Vanilla, patterned paper is called December 25th by Kaisercraft.
Ink: Old Olive, Cherry Cobbler, Crumb Cake, Daffodil Delight, Memento ink in Tuxedo Black, Basic Black marker.
Stamps: Ornate Ornaments by Lawn Fawn.
Other: Basic Rhinestones, sponge.
Tips and Tricks:
1. Since I was making so many cards I did it all in stages like an assembly line:
- Made a prototype.
- Paper pieced the ornaments.
- Cut the base cards and card layers.
- Sponged the edges of the Very Vanilla with Crumb Cake ink.
- Stamped images on the Very Vanilla.
- Attached paper pieced ornaments.
- Stamped sentiments on base cards.
- Wrote messages in all the cards.
- Attached layers to card fronts and added rhinestones.
- Addressed envelopes and now they are ready to post!
3. I use my scissors to help me attach the sticky back rhinestones accurately. I find it easier than using tweezers.
Stuff Ups:
1. Lots. When making so many cards, mistakes are easy to make. The most mistakes were to do with stamping, the image smudging or not stamping fully, etc, etc.
Monday, November 7, 2011
The last of the brown (for now)
So I made this card for my friend Tracey whose birthday is today (Happy birthday Trace!) and my husband said it's nice but I've been using too much brown lately (yeah, brown has been my neutral colour of choice, mainly because I bought a whole pack of it). I thought this sounded like a challenge (in a warped kinda way) so I'm making cards without brown for a little while! This is the last of the brown for now:
The design of this card is from an old Stampin' Up catalogue. I've tweaked it to suit my whims.
Materials:
Cardstock: Chocolate Chip, Crumb Cake, Whisper White, Elegant Soiree DSP.
Ink: Versamark, Memento Tuxedo Black, Crumb Cake.
Stamps: Blissful Botanicals and Sophie's Sentiments by Lawn Fawn.
Other: Fiskars Eyelet border punch, Victoria crochet trim (I've called it lace in the past but it's not really called that), Perfect Pearls Mist in Heirloom Gold, American Craft ribbon, circle punch, Basic pearls, Big Shot machine, Beautiful Wings embosslit, mini glue dots, sponge, Fiskars corner rounder punch.
Tips and Tricks:
1. I lightly misted the Whisper White panel with the Perfect Pearls and let in dry before stamping on the sentiment.
2. I sponged around the butterflies with Crumb Cake ink.
Stuff Ups:
1. I messed up the alignment of the border punch so I had to do that again.
Pleasant Surprises:
1. I got the sentiment stamped correctly, first time! Gosh, I love Lawn Fawn stamps!!
The design of this card is from an old Stampin' Up catalogue. I've tweaked it to suit my whims.
Materials:
Cardstock: Chocolate Chip, Crumb Cake, Whisper White, Elegant Soiree DSP.
Ink: Versamark, Memento Tuxedo Black, Crumb Cake.
Stamps: Blissful Botanicals and Sophie's Sentiments by Lawn Fawn.
Other: Fiskars Eyelet border punch, Victoria crochet trim (I've called it lace in the past but it's not really called that), Perfect Pearls Mist in Heirloom Gold, American Craft ribbon, circle punch, Basic pearls, Big Shot machine, Beautiful Wings embosslit, mini glue dots, sponge, Fiskars corner rounder punch.
Tips and Tricks:
1. I lightly misted the Whisper White panel with the Perfect Pearls and let in dry before stamping on the sentiment.
2. I sponged around the butterflies with Crumb Cake ink.
Stuff Ups:
1. I messed up the alignment of the border punch so I had to do that again.
Pleasant Surprises:
1. I got the sentiment stamped correctly, first time! Gosh, I love Lawn Fawn stamps!!
Saturday, September 10, 2011
Clean and Simple Birthday
I wanted to make a clean and simple birthday card for my friend Nean so I set myself a 20 minute challenge! This is the result:
The green does look much better in real life (like most cards do) and is textured which hasn't been picked up too well by the camera. That's probably my fault, not the camera's.
Materials:
Cardstock: Crumb Cake, Kiwi Kiss textured, Island Oasis DSP, Tempting Turquoise, Very Vanilla.
Ink: Tempting Turquoise.
Stamps: Teeny Tiny Sentiments.
Other: Big Shot machine, Top Note die, Victorian lace, Beautiful Wings embosslit, Basic Pearls, Modern label punch, dimensionals, mini glue dots.
Non Stampin' Up: None.
Tips and Tricks:
1. There are none really, this card is as easy as they get. I suppose I'll tell you that I cut up the Basic Pearl Strips into segments of two or three pearls and used them as the butterflies bodies.
2. The butterflies are stuck on with mini glue dots.
Stuff Ups:
1. This card could certainly be jazzed up with a bit of time and effort but I'm pleased with it as is.
2. Probably should have used Old Olive instead of Kiwi Kiss but I really wanted to use textured cardstock and I don't have textured Old Olive.
The green does look much better in real life (like most cards do) and is textured which hasn't been picked up too well by the camera. That's probably my fault, not the camera's.
Materials:
Cardstock: Crumb Cake, Kiwi Kiss textured, Island Oasis DSP, Tempting Turquoise, Very Vanilla.
Ink: Tempting Turquoise.
Stamps: Teeny Tiny Sentiments.
Other: Big Shot machine, Top Note die, Victorian lace, Beautiful Wings embosslit, Basic Pearls, Modern label punch, dimensionals, mini glue dots.
Non Stampin' Up: None.
Tips and Tricks:
1. There are none really, this card is as easy as they get. I suppose I'll tell you that I cut up the Basic Pearl Strips into segments of two or three pearls and used them as the butterflies bodies.
2. The butterflies are stuck on with mini glue dots.
Stuff Ups:
1. This card could certainly be jazzed up with a bit of time and effort but I'm pleased with it as is.
2. Probably should have used Old Olive instead of Kiwi Kiss but I really wanted to use textured cardstock and I don't have textured Old Olive.
Monday, July 25, 2011
My poor hubby!
My lovely hubby had an operation last week and I made him a get well card for his stay in hospital. This card was kind of a challenge as I had only a small bag containing my most basic card making items in it. I knew I wanted to use my new French Foliage stamp set and some colours from the Regals collection. I threw in some things that I thought would work and this is the result:
Materials:
Cardstock: Crumb Cake, Very Vanilla.
Ink: Always Artichoke, Not Quite Navy, Bravo Burgundy, Versamark.
Stamps: French Foliage, So Happy For You.
Other: None
Non Stampin' Up: Charcoal grosgrain ribbon, black rhinestones, Perfect Pearls Mist in Heirloom Gold, edge distresser tool.
Tips and Tricks:
1. After I stamped the card base, I spritzed the card with the Perfect Pearls mist for a nice gold sheen. You can see it above the sentiment layer where the camera flash highlights it.
2. I also spritzed the sentiment layer after crumpling the cardstock because it was too bare and new.
3. Some of the leaves have been stamped after first stamping off on a scrap piece of paper. This softens the colour and produces a lighter effect.
4. The Versamark has been used to stamp splodges from the French Foliage set over the leaves, on the sentiment layer and inside the card.
Stuff Ups:
1. I originally used the masking technique to create the background of leaves and gold spritz and left a blank centre rectangle for the sentiment but it didn't look right. Essentially, the Very Vanilla hides some mistakes. The Very Vanilla cardstock may be too bright and I could have used more Crumb Cake I suppose. I didn't have any with me and I like the Vanilla as it is.
2. The charcoal ribbon doesn't quite match but I don't have any black.
3. The placement of the rhinestones could be more precise.
4. I need to learn how to make pretty bows instead of snaggly lopsided ones!
Materials:
Cardstock: Crumb Cake, Very Vanilla.
Ink: Always Artichoke, Not Quite Navy, Bravo Burgundy, Versamark.
Stamps: French Foliage, So Happy For You.
Other: None
Non Stampin' Up: Charcoal grosgrain ribbon, black rhinestones, Perfect Pearls Mist in Heirloom Gold, edge distresser tool.
Tips and Tricks:
1. After I stamped the card base, I spritzed the card with the Perfect Pearls mist for a nice gold sheen. You can see it above the sentiment layer where the camera flash highlights it.
2. I also spritzed the sentiment layer after crumpling the cardstock because it was too bare and new.
3. Some of the leaves have been stamped after first stamping off on a scrap piece of paper. This softens the colour and produces a lighter effect.
4. The Versamark has been used to stamp splodges from the French Foliage set over the leaves, on the sentiment layer and inside the card.
Stuff Ups:
1. I originally used the masking technique to create the background of leaves and gold spritz and left a blank centre rectangle for the sentiment but it didn't look right. Essentially, the Very Vanilla hides some mistakes. The Very Vanilla cardstock may be too bright and I could have used more Crumb Cake I suppose. I didn't have any with me and I like the Vanilla as it is.
2. The charcoal ribbon doesn't quite match but I don't have any black.
3. The placement of the rhinestones could be more precise.
4. I need to learn how to make pretty bows instead of snaggly lopsided ones!
Sunday, July 10, 2011
Another blokey birthday
It's been a month since I've updated this - I've only made one other card apart from this one. That's due to life and work issues, blah, blah, blah!
This card was for my husband's good friend. I was running out of card ideas for guys and looked for some inspiration. I found it through a card at Art with Heart by Claire Daly. If you scroll down, it's the second card - the shapes and style are simple but lovely. I changed it up a lot to make a not-as-lovely card (unfortunately, not deliberately!)

Materials:
Cardstock: Crumb Cake, Whisper White.
Ink: Stazon black, So Saffron (marker), Always Artichoke (marker), Crumb Cake (marker), Chocolate Chip (marker and ink pad), Versamark.
Stamps: So Happy For You.
Other: Hemp twine, sponge, dimensionals.
Non-Stampin' Up: Green jewel brads, paper from American Crafts: Merrymint - Peanut Brittle, Fudge, Birthday clear stamps - brand unknown, black embossing powder, heat gun, Fiskars corner punch.
Tips and Tricks:
1. The 'birthday wishes' sentiment is stamped on a strip of Whisper White cardstock and adhered to the patterned paper.
2. The edges of the base card and the sentiment layer are roughly sponged with Chocolate Chip ink.
Stuff Ups:
1. The twine is a bit too loose for my liking.
2. The cross hatch layer is not centred.
3. My black embossing powder started to clump due to moisture and was difficult to work with. It was good quality stuff but both my black and white have become clumpy. None of the other brands do this. I wish I could remember the brand but I put my embossing powders in plastic containers and throw out the little jars.
4. My Stampin' Up corner puncher is crap I'm sorry to say. Apart from the cover popping off and it being difficult to unlock, it kept biting into my corners too far. My new Fiskars punch only cost me $8 and is a breeze to use. That's 3 strikes so far Stampin' Up - my Crystal Effects, Corner Punch and SNAIL dispenser.
Saturday, March 12, 2011
Hardworking Birthday
This card was designed for my brother for his birthday. This is a purely me card - no casing at all! I am pleased that I got to use a new blokey stamp set that I bought a while ago. I also made an extra one of these for my nephew as it's his birthday next week. These guys are in their twenties and thirties so I tried to make the card age appropriate.
You can also see how the summer sun and water restrictions have affected our poor grass - it was lovely and lush in the Valentine's photo, now it's almost dead. Thankfully it should grow back soon since the weather is getting cooler.
Materials:
Cardstock: Crumb Cake, Chocolate Chip, Brocade Blue (which is retired, you could use Baja Breeze instead), Very Vanilla and some Blueberry Crisp DSP.
Inks: Chocolate Chip ink pad and Versamark.
Other: Oval punch, Scallop oval punch, silver embossing powder, sponge, big shot machine, dimensionals, piercing tool, piercing guide and mat pack.
Non Stampin' Up: Sizzix textured embossing folder (probably 'burlap'), heat tool, screw top brads, Clear stamps 'Tools' (http://www.sullivans.net/ though I bought mine from Starfish Lane in Mt Lawley), 'Birthday wishes' sentiment from Wendy Irving Collections: Expressions Clear Cling Stamps - 'Occasions', distressing tool.
Tips and Tricks
1. I used a distressing tool to scuff the edges of the base card, chocolate chip and brocade blue layers.
2. I used chocolate chip ink to roughly sponge around the edges of the card base, the scalloped oval and the oval.
3. I put the chocolate chip layer up on dimensionals to compensate for the screw top brads in the top right corner. If you don't, you end up with an obvious bump where the brads are.
4. On the inside of the card I use another birthday stamp as the sentiment and another Tools stamp - a man pushing a trolley full of tools like he's in a hardware store. I used chocolate chip to continue the theme.
Stuff Ups:
1. I tried to stamp the inside of the card after I had attached the details to the front. The result was a messy. incomplete impression so I had to redo the base. Always stamp the base first!
2. There was a problem with the trolley stamp - one small portion was cut too thin so it didn't imprint on the card properly. I used a chocolate chip marker to fill in the mssing details.
You can also see how the summer sun and water restrictions have affected our poor grass - it was lovely and lush in the Valentine's photo, now it's almost dead. Thankfully it should grow back soon since the weather is getting cooler.
Materials:
Cardstock: Crumb Cake, Chocolate Chip, Brocade Blue (which is retired, you could use Baja Breeze instead), Very Vanilla and some Blueberry Crisp DSP.
Inks: Chocolate Chip ink pad and Versamark.
Other: Oval punch, Scallop oval punch, silver embossing powder, sponge, big shot machine, dimensionals, piercing tool, piercing guide and mat pack.
Non Stampin' Up: Sizzix textured embossing folder (probably 'burlap'), heat tool, screw top brads, Clear stamps 'Tools' (http://www.sullivans.net/ though I bought mine from Starfish Lane in Mt Lawley), 'Birthday wishes' sentiment from Wendy Irving Collections: Expressions Clear Cling Stamps - 'Occasions', distressing tool.
Tips and Tricks
1. I used a distressing tool to scuff the edges of the base card, chocolate chip and brocade blue layers.
2. I used chocolate chip ink to roughly sponge around the edges of the card base, the scalloped oval and the oval.
3. I put the chocolate chip layer up on dimensionals to compensate for the screw top brads in the top right corner. If you don't, you end up with an obvious bump where the brads are.
4. On the inside of the card I use another birthday stamp as the sentiment and another Tools stamp - a man pushing a trolley full of tools like he's in a hardware store. I used chocolate chip to continue the theme.
Stuff Ups:
1. I tried to stamp the inside of the card after I had attached the details to the front. The result was a messy. incomplete impression so I had to redo the base. Always stamp the base first!
2. There was a problem with the trolley stamp - one small portion was cut too thin so it didn't imprint on the card properly. I used a chocolate chip marker to fill in the mssing details.
Sunday, December 19, 2010
Christmas Part Two
The green card is almost identical to the one in my last post but I just wanted to show how rearranging the layout can make for a more (or less) interesting card. Yes, there is horrible staining on the ribbon of the other card. A lesson was learned there!
Rating: Dodgy ('cause of the staining)
Rating: Decent
These cards are made in the same way and use the same materials as I have listed in my previous post. The only differences are that I have added a thin strip of Jolly Holiday DSP to the right of the green card (I adhered it with 2 way glue) and the base of the other card is Crumb Cake cardstock, I've used Old Olive grosgrain ribbon on it and have coloured the stocking stamp with markers (Old Olive and Real Red).
The staining. The ribbon was popping up a little bit so I used a bit of 2 way glue to stick it down, which it did do but, as you can clearly see, it has stained the ribbon. So you can learn something at my expense - DON'T use a 2 way glue pen for sticking ribbons!!
Subscribe to:
Posts (Atom)