My lovely hubby had an operation last week and I made him a get well card for his stay in hospital. This card was kind of a challenge as I had only a small bag containing my most basic card making items in it. I knew I wanted to use my new French Foliage stamp set and some colours from the Regals collection. I threw in some things that I thought would work and this is the result:
Materials:
Cardstock: Crumb Cake, Very Vanilla.
Ink: Always Artichoke, Not Quite Navy, Bravo Burgundy, Versamark.
Stamps: French Foliage, So Happy For You.
Other: None
Non Stampin' Up: Charcoal grosgrain ribbon, black rhinestones, Perfect Pearls Mist in Heirloom Gold, edge distresser tool.
Tips and Tricks:
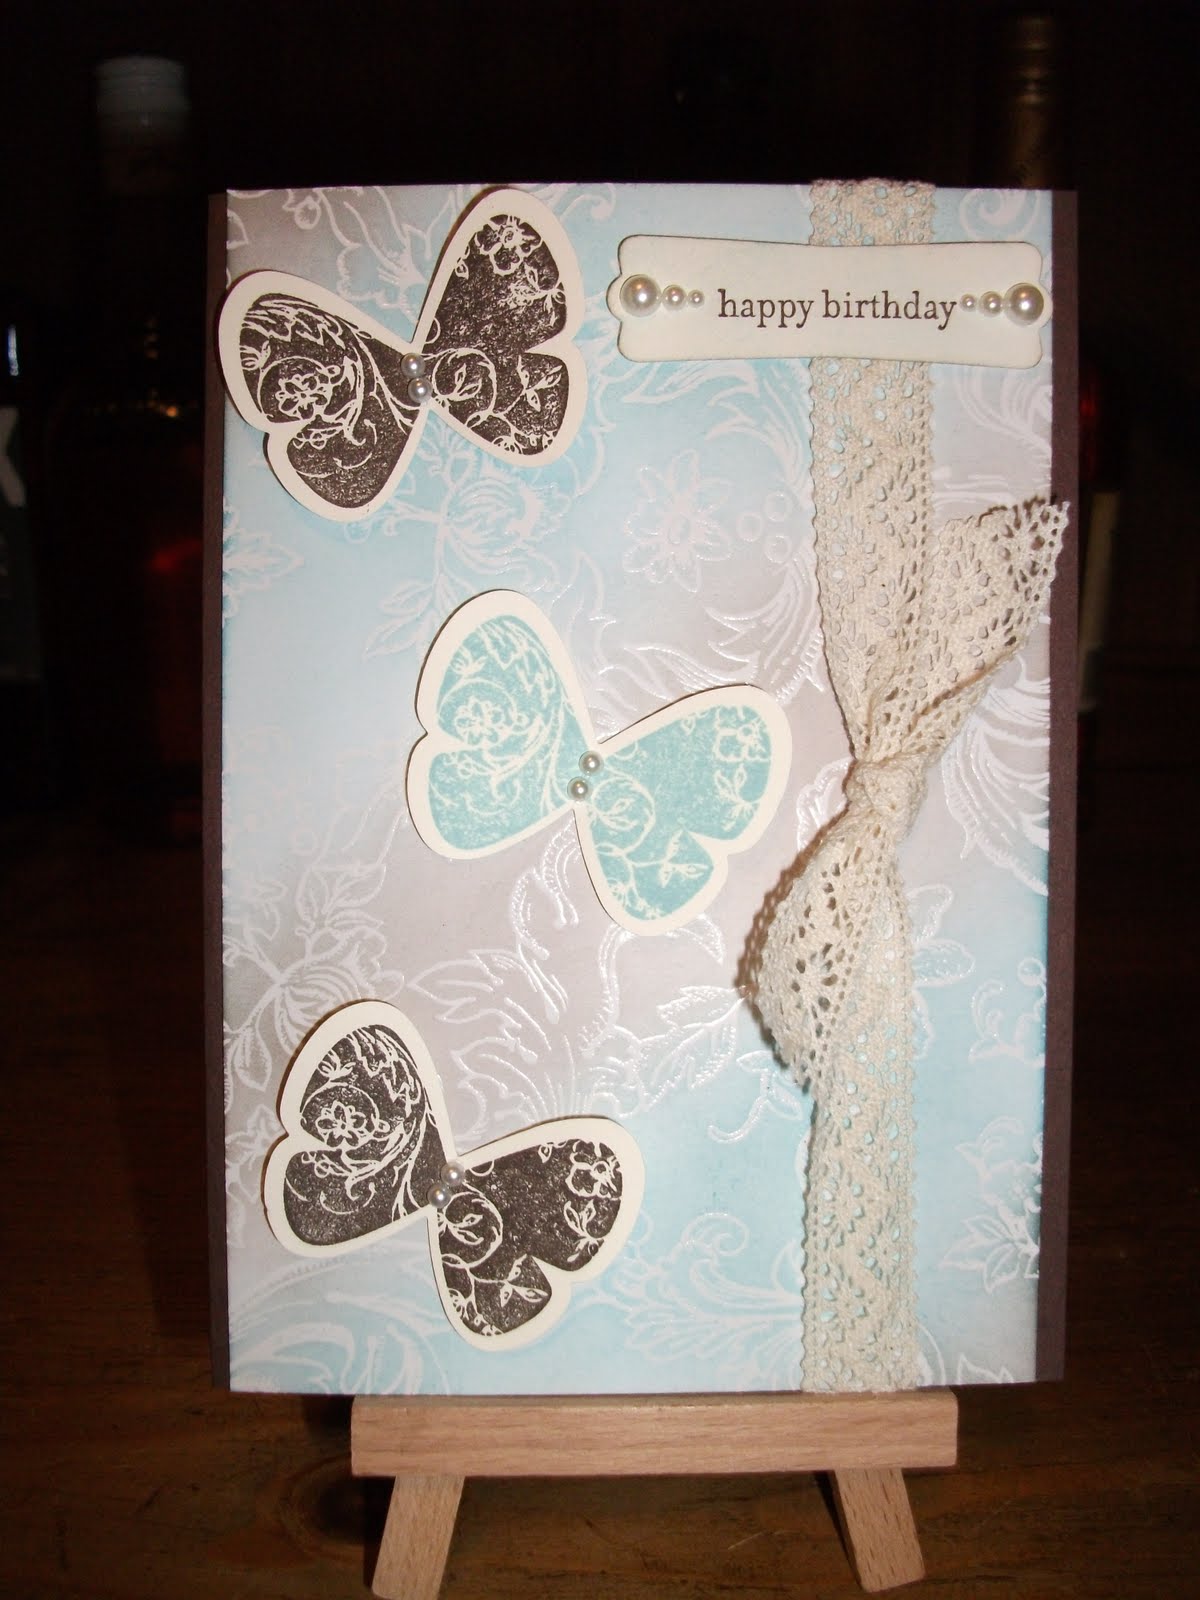
1. After I stamped the card base, I spritzed the card with the Perfect Pearls mist for a nice gold sheen. You can see it above the sentiment layer where the camera flash highlights it.
2. I also spritzed the sentiment layer after crumpling the cardstock because it was too bare and new.
3. Some of the leaves have been stamped after first stamping off on a scrap piece of paper. This softens the colour and produces a lighter effect.
4. The Versamark has been used to stamp splodges from the French Foliage set over the leaves, on the sentiment layer and inside the card.
Stuff Ups:
1. I originally used the masking technique to create the background of leaves and gold spritz and left a blank centre rectangle for the sentiment but it didn't look right. Essentially, the Very Vanilla hides some mistakes. The Very Vanilla cardstock may be too bright and I could have used more Crumb Cake I suppose. I didn't have any with me and I like the Vanilla as it is.
2. The charcoal ribbon doesn't quite match but I don't have any black.
3. The placement of the rhinestones could be more precise.
4. I need to learn how to make pretty bows instead of snaggly lopsided ones!
Monday, July 25, 2011
Sunday, July 24, 2011
Tomorrow!
I have a couple of new cards to talk about and I hope I can post them tomorrow.
I had to edit the 'Double but Different' posts as I labelled the lace I had used as Chantilly lace when in fact it was Victoria lace. Sorry about that. I had forgotten that I bought both and didn't check the label properly. One of the cards that I will post tomorrow does have the Chantilly lace so you can see the difference. I bought the Victoria lace because it's so pretty and I bought the Chantilly lace because I like the name, odd creature that I am. The lace is pretty too but I prefer the Victoria lace.
See you tomorrow!
Saturday, July 16, 2011
A Little Birthday
I don't have much of a call for kids cards as there simply aren't many kids in our family right now - only two. This card I designed for the youngest kid - he has just turned two. I must get some more kid oriented stamps for future years.
This card was inspired by a set of decorative brads I bought featuring cute balloons and birthday cake slices. I didn't end up using any of those on the cover! The blue stars and the big round brads are from that set though.
Materials:
Cardstock: Shimmery White, Gable Green (retired), Real Red, Pacific Point, Whisper White.
Ink: Pacific Point (ink and marker), Pumpkin Pie (marker), Real Red (marker), Daffodil Delight (marker), Chocolate Chip (marker), Versamark, Stazon black.
Stamps: None that are from Stampin' Up.
Other: Pumpkin Pie taffeta ribbon, Lattice embossing folder, big shot machine, Paper piercing tool, mat pack, sponge, dimensionals.
Non Stampin' Up: Fiskars clear stamps - Cookies, Cake & Ice Cream stamp set, Put On Your Party Hat stamp set, Square scallop punch, Doodlebug Designs brads, Fiskars Cupcake border punch.
Tips and Tricks:
1. The scallop squares have Pacific Point ink sponged around the edges to liven them up a little. The squares are also popped up on dimensionals.
2. The stamps on the scallop squares were all stamped in Versamark, then Stazon black, then heat embossed. I find that makes colouring them in easier. The images were all coloured in with markers.
3. Shimmery White is a lot thicker cardstock than Whisper White so I always choose it for a card base.
Stuff Ups:
1. The main reason for the green panel is that the lattice embossing folder doesn't reach to the bottom of the card and I needed a way to hide it.
2. I was going to have more of the green colour in the stamped pictures on the scallop squares but I forgot that I didn't have a marker in that colour. Thankfully there is a little green in those big brads to tie it in better. I also used the green inside the card to make a layer to cover up the back of the brads and that unembossed portion.
3. I kind of wish I used a different colour than green so I could make that cupcake border stand out more. It looks a bit grass and picket fencey to me. Having said that, using blue or red would be too much. Orange would make the ribbon pointless....yellow maybe? Brown?
Double But Different Part 2
So the first twin card is in my previous post. This card I made for Emma. I hope both of them like their cards!
Here's the card recipe (I know I should say procedure but recipe sounds so much cuter):
Materials:
Cardstock: Crumb Cake, Rich Razzleberry, Very Vanilla, Chocolate Chip.
Ink: Rich Razzleberry, Chocolate Chip, Versamark.
Stamps: Bliss, Itty Bitty.
Other: Top note die, big shot machine, Vintage Wallpaper embossing folder, Hemp twine, Itty Bitty buttons, Victoria lace, modern label punch, basic pearls, mini glue dots.
Non Stampin' Up: sentiment stamp from CheeseCake Party by Penny Black, Zing gold glitter embossing powder by American Crafts.
Tips and Tricks:
1. There are small pearls on the vintage wallpaper embossing but the photo doesn't highlight them.
2. The butterflies were stamped by using the 'Rock and roll' technique. I'd recommend that you search youtube for a video demonstrating the technique. I inked up the stamp in Rich Razzleberry then rolled the edges around on a Chocolate Chip ink pad. Voila! Two toned stamping.
3. The Victoria lace is just some scrap ends I had left over that are tucked and glued under the top note die cut with mini glue dots.
4. I used a mini glue dot to anchor the middle itty bitty button to keep them faced up.
Stuff Ups:
1. The clear mount block I used for the 'rock and roll' technique was too big which inhibited my control over the amount of 'roll' I could do. I would use the smallest block I possibly could if I were to do this technique again.
2. I probably should have glued all three itty bitty buttons or none at all because it looks a little lopsided with just one glued.
3. The gold glitter embossing powder - while I like the gold colour it produced, the glitter in the powder caused the end result to be a bit lumpy. I would have liked a smoother end result. Ideally, a gold powder without glitter in it would be a better choice.
Monday, July 11, 2011
Double But Different Part 1
I've just made two birthday cards for my husband's twin nieces birthday (they're grown up not kids) and since the two of them are so different, I've made very different cards. This is the card I made first for Jess.
Materials:
Cardstock: Early Espresso, Very Vanilla, Specialty DSP (retired I guess, it was in the summer mini catalogue).
Ink: Early Espresso, Baja Breeze.
Stamps: Butterfly Prints, Teeny Tiny Sentiments.
Other: Sponge, Modern label punch, Basic Pearls, Victoria lace (also from the summer mini), dimensionals, mini glue dots, Butterfly punch.
Non Stampin' Up: Nothing, woohoo!
Tips and Tricks:
1. I used caution when sponging the specialty DSP which means use ink sparingly. I lightly inked my piece of sponge then dabbed it onto scrap paper a few times before using it. I started at the edges and in circular motions I applied and buffed the ink onto the paper. It took a while to do. When finished, I used a clean sponge to buff over the whole image which removed any excess ink from the embossing and made it pop!
2. I adhered the butterflies with mini glue dots.
3. The sentiment label is sponged in Early expresso around the edges and lightly sponged on the face with Baja Breeze. I did this to dull the brightness of the bare Very Vanilla cardstock. It's popped up on dimensionals so it doesn't interfere with the lace.
4. I used all 3 sizes of basic pearls on the sentiment punch, starting on the outside with the largest. I cut a pearl strip into smaller segments of 2 for the butterflies bodies.
Stuff Ups:
1. I wasn't carefully enough in measuring my DSP so I had to trim it after the sponging and lost some of the great edge effect I got from the sponging process. I responged the cut edge but it's not quite the same.
2. The 'happy birthday' sentiment is a little off centre but I can live with it.
Sunday, July 10, 2011
Another blokey birthday
It's been a month since I've updated this - I've only made one other card apart from this one. That's due to life and work issues, blah, blah, blah!
This card was for my husband's good friend. I was running out of card ideas for guys and looked for some inspiration. I found it through a card at Art with Heart by Claire Daly. If you scroll down, it's the second card - the shapes and style are simple but lovely. I changed it up a lot to make a not-as-lovely card (unfortunately, not deliberately!)

Materials:
Cardstock: Crumb Cake, Whisper White.
Ink: Stazon black, So Saffron (marker), Always Artichoke (marker), Crumb Cake (marker), Chocolate Chip (marker and ink pad), Versamark.
Stamps: So Happy For You.
Other: Hemp twine, sponge, dimensionals.
Non-Stampin' Up: Green jewel brads, paper from American Crafts: Merrymint - Peanut Brittle, Fudge, Birthday clear stamps - brand unknown, black embossing powder, heat gun, Fiskars corner punch.
Tips and Tricks:
1. The 'birthday wishes' sentiment is stamped on a strip of Whisper White cardstock and adhered to the patterned paper.
2. The edges of the base card and the sentiment layer are roughly sponged with Chocolate Chip ink.
Stuff Ups:
1. The twine is a bit too loose for my liking.
2. The cross hatch layer is not centred.
3. My black embossing powder started to clump due to moisture and was difficult to work with. It was good quality stuff but both my black and white have become clumpy. None of the other brands do this. I wish I could remember the brand but I put my embossing powders in plastic containers and throw out the little jars.
4. My Stampin' Up corner puncher is crap I'm sorry to say. Apart from the cover popping off and it being difficult to unlock, it kept biting into my corners too far. My new Fiskars punch only cost me $8 and is a breeze to use. That's 3 strikes so far Stampin' Up - my Crystal Effects, Corner Punch and SNAIL dispenser.
Saturday, June 4, 2011
A bright birthday
The best thing happened today. I dropped into my favourite stamping store (Stampit in East Vic Park) and they had a sale on Prima and Ki Creations - 50% off it all! I was like a kid in a candy shop and stocked up on all the Prima Flowers and Pebbles that I wanted. You can be sure to see a lot more of those in the future, starting today!
I made a card for my Mum's birthday but I wasn't completely happy with the way it turned out. I had to look to the internet for inspiration as I was suffering from brain burnout. I'll post the card I designed at a later date, but for now here is the card I was inspired to make:
No top note die or modern label punch, aren't you proud of me??
The colours are much bright in real life but that's what bad lighting and bad photography will do.
The card that inspired me to make this is from Ivanka's Card Studio.
Materials:
Cardstock: Basic Black, So Saffron, Melon Mambo, Crumb Cake and Shimmery White.
Ink: Stazon Black.
Stamps: Curly Cute.
Other: Big shot machine, Vintage wallpaper embossing folder, dimensionals, mini glue dots.
Non Stampin' Up: Flowers (Prima Flowers - Raspberry), Blue rhinestones (BoBunny Jewels - Barefoot & Bliss).
Tips and Tricks:
1. This card is pretty straight forward - simple layers and the shimmery white card is dry embossed with the vintage wallpaper embossing folder.
2. The flowers are adhered to the card with mini glue dots.
3. The sentiment is popped up on dimensionals.
Stuff Ups:
1. The sentiment took me ages today because I couldn't stamp it perfectly so I kept redoing it, then I'd get it right but cut it crooked and have to start over. Sooo frustrating!
2. I tried using basic black ink but it kept bleeding through the cardstock. Stazon gives a much crisper result, however, it does stain your stamp.
3. I need to buy new blades for my paper trimmer so the layers are a bit straggly around the edges.
Subscribe to:
Posts (Atom)